
[Title] [text TOC] [image TOC] [Site Search]
 [Donation]
[Donation]
[Donation]
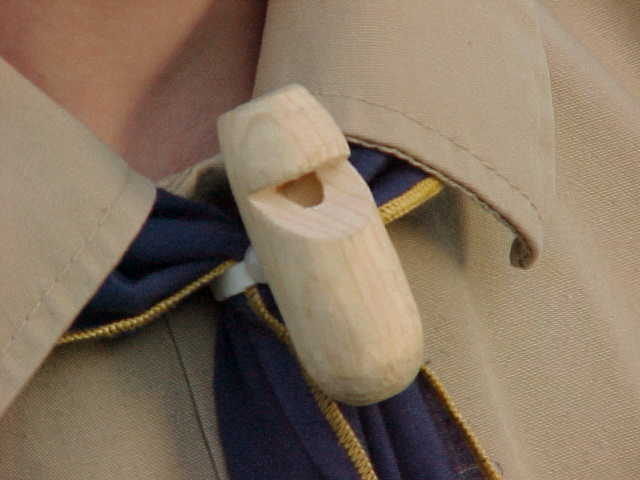
| Wooden Whistle |
|---|
| Materials | Tools |
|---|---|
|
Wooden block 3"x3/4"x3/4" 5/16" dowel 2" long PVC ring |
Saw Drill and 5/16" bit Knife Sandpaper Wood glue |
See the Wood Carving section for more instructions, hints and tips.
This is an easy first project for young whittlers. This makes a great camping activity, especially for Webelos Scouts.
A whistle is one of the best signaling devices if you are lost in the woods because it takes very little energy to blow and can be heard all around for a good distance.
It is best to drill the hole and cut the notch ahead of time. Make up a bunch at one time then you'll have them when you need them.
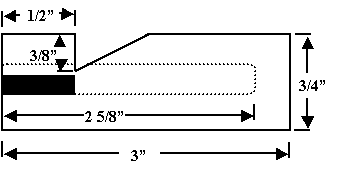
Prepare the blank - Cut the 3/4"x3/4" lumber 3" long. Drill a 5/16" hole down the center of the block. Make the hole 2 5/8" deep. Use a lip and spur drill bit (also known as a brad point or doweling bit) and go slowly to make a clean hole. Cut the wedge as shown in the drawing below. It is 3/8" deep and 1/2" long. You could also make this with a knife.
Form the Dowel Rod Insert - This is shown in black in the diagram below. Cut a 5/16" dowel rod 1" to 2" long. Sand one side of it flat. The flat side should be about 1/4 to 1/3 of the diameter of the dowel rod. You'll only need about 1/2" of the dowel, but being longer makes it easier to handle.
Fitting the Dowel Rod Insert - Slide the dowel rod into the hole in the block. The end of the dowel should be near the spot that the wedge intersects the hole. See the drawing below. The dowel will stick out the end of the block for now; it will be trimmed to size later. Try blowing into the whistle. You may have to move the dowel in and out slightly to get it to work. Notice the difference in tone and how difficult it is to make a sound. It should be easy to blow and should not sound "airy" when you blow hard. Get the dowel positioned so it makes the best sound, then cut off the dowel (while it is still in the block of wood). Remove the dowel, put a thin coat of wood glue on the rounded part and return it to the hole. Use a knife blade to push the dowel into place. Try it to make sure it works, if not then reposition the dowel insert as needed.
If you have problems making the whistle work, see these Trouble Shooting Hints.
Shape the whistle - Whittle the whistle into a nice round shape. Sand the outside to make it smoother.
Finish the neckerchief slide - Glue a PVC ring to the back of the whistle using E-6000™ glue.

You can make whistles with different pitches by changing the length of the hole. The notch remains the same, only the length of the block of wood and the depth of the hole change. Make a high-pitched whistle from a block 2" long with a 1 5/8" deep hole. Make a medium pitch with a block 2 1/2" long with a 2 1/8" deep hole. Do you see a pattern? Make a whistle with a lower tone by making the block and hole 1/2" longer.
You might also be interested in making a more advanced Decorative Whistle.