
[Title] [text TOC] [image TOC] [Site Search]
 [Donation]
[Donation]
[Donation]
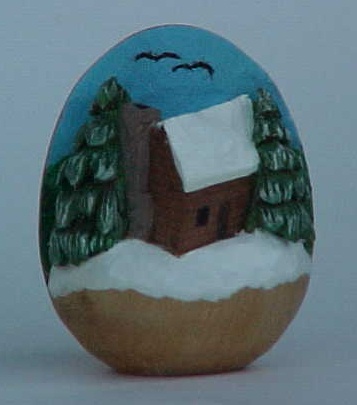
| Cabin Scene on Egg |
|---|
| Materials | Tools |
|---|---|
|
Basswood Egg PVC Ring |
18" leather or cord Pencil Carving knife 1 mm V-tool E-6000™ glue |
See the Wood Carving section for more instructions, hints and tips.
This is not a very difficult project to carve, but it is a difficult project to visualize and get started.
It takes about an hour to rough out the cabin, an hour to rough out the trees and background, an hour to finish each tree, and an hour to finish the cabin trim and cleanup.
|
1.
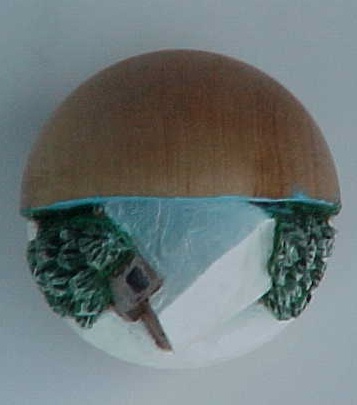
Locate the edge grain on the egg. These are the lines that run from the top to the bottom of the egg. Center your carving on the edge grain. You should have a bull’s-eye pattern on the left and right sides of the egg. |
|
2.
Draw the outline or frame of the area you are going to carve lightly with a pencil. Wrap string, rope, or leather around the egg to act as a guide. See the front and side views below. The top 3/4 should be egg shaped, that is, follow the outline of the egg, slightly smaller than the egg. The bottom part is about flat. The bottom area is where you are going to carve the hill. The bottom of the outline should be about a third of the way up on the egg. Don’t make your lines dark, and be sure to remove them while carving. Otherwise, you will have to sand the line off and then the rest of the egg. |
|
3.
Roughly sketch the cabin and trees on the egg. The front corner of the cabin should be near the middle of the vertical centerline and about 1/4" below the horizontal centerline. Don’t angle the cabin up at too steep of an angle.  |
|
4.
Start carving the cabin. This is the most difficult part of the carving - finding the cabin in the egg. Make stop cuts along the base of the long wall of the cabin, the front corner, and the back edge by the tree. Carve into the egg at about a 45 degree angle relative to the centerline of the egg to establish the long wall of the cabin. Take out vertical slices of wood from the roof to the base of the wall. The corner of the cabin should be about 1/8" back from the face of the egg. Make this wall extra long because the chimney will be taken out of it. Leave as much of the tree in front of the cabin and chimney as you can.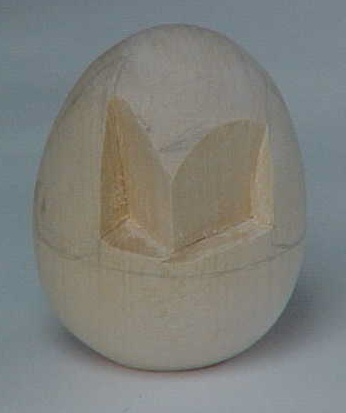 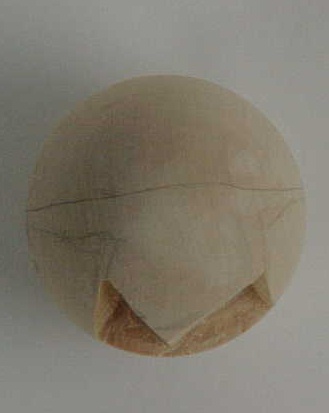 |
|
|
5.
Then carve the short wall with the chimney at the opposite 45 degree angle. You are trying to carve a box, so the walls should make a right or 90 degree angle. Make stop cuts along the tree and base to establish the outside edge of the chimney. In the top view above, this is the dotted line. Basically, you are making a block containing the cabin and fireplace chimney. Later you will remove the corner of the cabin to make the fireplace. Inspect your carving from the top to make the corner of the cabin a 90 degree right angle. |
|
|
6.
Once you have the sides of the cabin defined, start removing the wood above the cabin and between the trees. I make cross hatch cuts then slice them off with a vertical cut parallel to the background. Work to make the background flat. Leave extra wood sticking up above the roof peak for the chimney. |
|
|
7.
Shape the roof. Make sure the roof ridge line is parallel to the base of the long wall of the cabin. |
|
|
8.
Remove the block of wood at the corner of the cabin to form the chimney. About a third of the way up from the bottom of the chimney, add a step to decrease the size of the top of the chimney. |
|
9.
Start shaping the trees. They should be a general cone shape. Round any pointed corners. The top third of the trees should be cut out away from the back of the carving. The sides of the trees should curve around behind. This gives it more of a 3-dimensional look by separating the trees from the background. The tree on the left hides the back part of the chimney.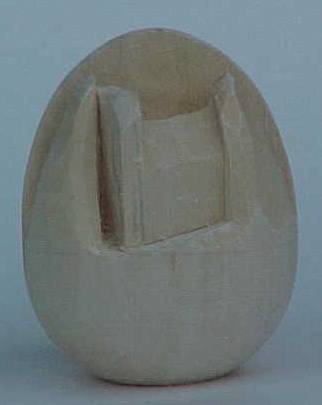 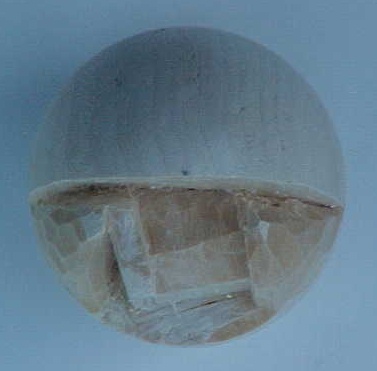 |
|
|
10.
To shape the branches of the tree, start at the top of the tree and draw U shapes as shown in the drawings below. This is similar to shingles on a roof, but instead of a straight line, they should roughly follow the curve of the bottom of the tree. They should look a little random (by varying the length and width) to give them a more natural appearance. The U shapes at the top of the tree should be slightly smaller than the ones at the bottom. However, smaller is more difficult to carve as they tend to break more easily. Repairs can be made with super glue. |
|
|
11.
Use a small (1 mm) V-tool to cut along all the U shapes. The drawings on the right in the following steps show a cut away side view and a front view. The cut that is being described is highlighted. |
 |
| 12. Form each branch starting at the bottom of the tree and working your way around and up the tree. Choose one branch, A, and use your knife to make a stop cut in the V cuts at the top of branch A at the tip of branches D and C. |
 |
| 13. Now remove the upper 3/4 of branch A to the stop cut, angling deeper at the top of the branch. This angles the branch back towards the trunk. Clean out the sliver of wood to form the branch. |
 |
| 14. Now we are going to undercut branch A under D and C to create a shadow on the inner part of the branch (dotted line in front drawing). Cut in from the bottom of the branches D and C. Extend the cut made in the prior step up and under the branches D and C. You might make this at a greater or deeper angle than the original cut. Remove the wedge of wood beneath branches D and C. |
 |
|
15.
Repeat steps 12 through 14 for branch B. |
|
| 16. Remove the wood below the tip of branch D, at the spot where branches A, B and D intersect, indicated by the arrow in the diagram. |
 |
|
17.
Be sure the sides of A and B are separated from each other. If they aren’t, remove a sliver of wood between them. Round the branches so they don’t look unnaturally flat. |
|
|
18.
Continue this process until you have made each branch. |
|
|
19.
Remove the wood below the lowest branches using the method described above. You can leave a trunk if you want. |
|
|
20.
Using the small (1 mm) V-tool, make random cuts on all the branches to give it finer detail and texture. This will also hide any mistakes. |
|
|
21.
Use a toothbrush to remove the fuzz on the tree. |
|
|
22.
Repeat the same process for the other tree. |
|
|
23.
Slope the ground leading up to the cabin and under the trees. |
|
|
24.
Flatten out the background as smooth as you want. |
|
|
25.
Draw the birds on the background and carve them with a small V-tool or knife. The birds were a trademark of my grandfather's oil paintings. |
|
|
26.
Remove a thin area from the long wall of the cabin to make the roof hang over the edge of the cabin wall. |
|
|
27.
Using your knife, cut the lines on the cabin to represent the logs. You can add windows and doors if desired. Since the knife blade is thin, you can go back over the lines with a small flat chisel to define them better. |
|
|
28.
Using your knife or chisel, cut random shaped lines for the rock of the chimney. |
|
Finish the scene as you like with acrylic paint or your favorite finish.
To display your project, you can mount the egg on a base using a dowel to connect the egg to the base. Either mount the egg flush against the base or raised above it. Another method is to put a screw eye and ribbon in the top of the egg to hang it as an ornament. Then there is my favorite, glue a PVC ring to the back using E-6000™ to make a neckerchief slide.
To paint, first paint the birds black with a very fine pointed brush.
For the background sky, mix blue and white with a little water. Don’t get it too watery or it will flow into the birds. Using a short flat stiff brush, “paint” most of the paint onto a scrap piece of paper until the brush is almost dry. Then draw the flat side of the brush across the sky in a direction perpendicular to the area you are trying to avoid painting. That is, across the V cut valley not along it. This prevents the paint from getting into the depressions that form the birds. This is called the dry brush technique.
Paint the trees watered down green.
Paint the cabin watered down brown.
Paint the window black, and the door dark brown. Paint the chimney stone gray. Don’t thin these with too much water or the colors will run into the adjacent areas.
Paint the hillside and roof slightly watered down white.
Use the dry brush technique to highlight the tips of the tree branches with white.
To make the trees look even better, I give them a coat or two of Watco™ dark using a Q-tip or small brush. The Watco™ pools in the low areas making the shadows deeper. Be careful not to get it on the rest of the scene.
Finally, seal with Deft™.