

[Title]
[text TOC]
[image TOC]
[Site Search]
 [Donation]
 |
Bookmarker |
 |
| Materials |
Tools |
4"x1 1/2"x1/4" hardwood
Eye |
Carving Knife
Gouges
Pencil
Various Grit Sandpaper
Drill
Epoxy
Finish
Paper Clip |
See the Wood Carving section for more instructions, hints and tips.
Hardwoods are best for this project because they have prettier grain than basswood. Oak, mahogany, cherry, and maple all have beautiful grain. There isn't much carving so the project won't be too difficult.
You want the grain to run the length of the bookmarker.
You'll need a band saw to cut the groove about 2/3 of the length. A sturdy guide will be necessary and you will probably break a few in the process of cutting them. Then cut the outline shape on a scroll saw.
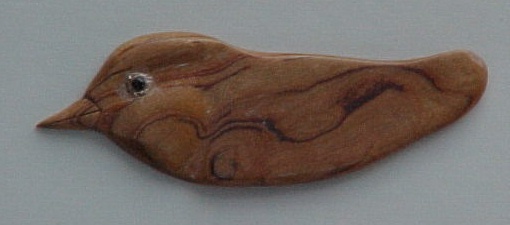
You can carve anything you want on the top of the bookmark. The instructions below are for a bird bust. It's more of a relief carving because it is so thin. Here are some other ideas of things you could put on the top: flower, four leaf clover, pumpkin, fish head, turtle, dove, cardinal, eagle, candle, lily, or angel. The shape is up to you. The overall length should be about 4" and the slot about 2/3 of the length. Only carve one side because it is so thin.
Carve the beak to last or it will poke your hand.
- Layout the eye, check, and shoulder.
- Gouge around the cheek, shoulder, and eye.
- Round the outside edges with a knife.
- Shape the bill. Make a V shaped V cut where the bill meets the head and a groove for the mouth. Trim the beak so it is smaller than where it meets the head.
- Sand with coarse (about 120 grit) sandpaper to round the cheek and smooth the valleys. Finish by sanding in the direction of the grain. You'll have to work hard to get all the scratches out of the valleys but it will be worth the trouble in the end.
- Then sand with medium (about 240 grit) and finally fine (about 400 grit) sandpaper. Inspect and remove any visible marks or scratches. You may have to use medium or coarse sandpaper to remove stubborn scratches. Then re-sand with finer grit.
- Drill or Dremel out a hole for the eye about 7/32" in diameter. Not too deep as you will go through the wood. Locate the eye relative to the beak. It should be just above the line that extends from the mouth.
- Mix the epoxy. Put it in the hole, push in the eye, and set it aside to dry.
- To show off the pretty grain use a glossy finish or polish it. Insert the paperclip into the slot to hang the bookmark up to dry.
- Instead, you could use a wood burner to make feather. Then paint the head just on one side. Finish the bottom and other side with a clear glossy finish or polish.
- Paint and finish as desired.
Copyright © 2007 Vincent Hale