
[Title] [text TOC] [image TOC] [Site Search]
 [Donation]
[Donation]
[Donation]
| String Art Flower |
|---|
| Materials | Tools |
|---|---|
|
8x16x1 inch wood 303 or 1.75 ounce 5/8 inch #18 finishing nails (wire brads) colored string pattern on 11x17 inch paper white paint |
Glue Scissors Hammer Paint brush Drop cloth |
See the String Chapter for more instructions, hints, tips, and ideas.
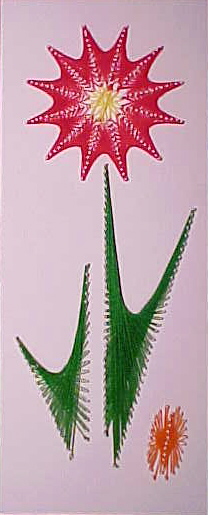
The flower in the photo above, took 36 feet of green for the large leaf, 13 feet of green for the small leaf, 6 feet of orange for the small bud at the bottom, 45 feet of red for the flower petals, and 4 feet of yellow for the center of the flower. These measurements contain a little extra so you shouldn't run short.
Hint: Use film canisters to hold the string so it doesn't get tangled. Put one end of the string inside the canister, then put on the lid. Then wind the remainder of the string around the outside of the canister.
Make sure that the string is always kept tight.

Start by tying (use a square knot) the string to one of the nails. Put a drop of glue on the knot, let it dry and trim off excess thread. Next run the thread UNDER the top nail on the right side. The string then is looped OVER the second nail on the left side. Continue until you get to the last nail (bottom right). Tie the string around the last nail with a square knot. Put a drop of glue on the knot, let it dry and trim off excess thread.
By looping the string UNDER the nails on the right and OVER the nails on the left, you keep the string from crossing and the results look neater.
Start at A and follow the red pattern until you get down to B. Make sure the string loops around the center column of nails is pushed down toward the wood. This will make it easier when working the other side of the flower bud. Now wrap the string around the B nail and continue with the blue pattern until you get down to C.
Start the flower petals like in the illustration for the Leaf Pattern above. When you get to the bottom nail, wrap it around the nail one time and continue with the next petal of the flower. As you work, push the string down on the nail. This will make working the next petal easier by giving you more room to wrap the next layer of string.
 |
 |
|---|---|
Do the center of the flower last. Since there are twelve petals, we will talk about
the flower center like it is a clock. Start by tying the string to the nail at 6 o'clock.
Put a drop of glue on the knot, but DO NOT trim off the excess string. Now follow this
pattern:
When you finish it should look like the pattern on the right above. Tie the two ends of the string together.