
[Title] [text TOC] [image TOC] [Site Search]
 [Donation]
[Donation]
[Donation]
| Gift Box |
|---|
| Materials | Tools |
|---|---|
|
Card stock or Christmas card |
Ruler Pencil Scissors |
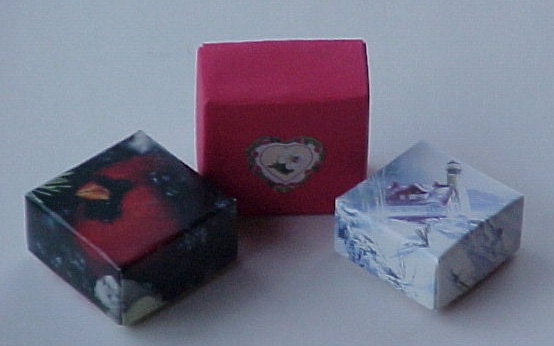
This little gift box was taught to me by Jean Caster. She uses them for her Wooden Carved Pocket Angel. Its finished size is 1 3/4" square by 7/8" tall. They are ideal for small Christmas or Valentines gifts.
This is a great way to make a small box for that special little gift. Inside put a special coin, a piece of candy, or some other treasure.
Neatness and accuracy really count in making this box. If you make the cuts and folds very precise, you will end up with a much prettier box that fits together snuggly.
If you want to give the makers a little help, cut out the squares before hand. You can speed up this work using a guillotine cutter. These are available in many offices and some office supply store for customer use.
Make the bottom of the box from white card stock paper or the back of a Christmas card. They can be made from thinner paper, but will be delicate. Poster board is a bit thick and is hard to bend to make sharp corners.
Make the lid of the box from colored card stock (add stickers or a bow to brighten it up) or from the front of a Christmas card. You might find this template helpful in lining up the picture.

For the bottom, use a ruler to measure and draw a perfect square 4 3/4 inches on a side. Then cut it out with scissors. Then repeat the above instructions to complete the bottom.
You can make boxes larger or smaller if you want. To determine the finished size, multiply the size of the square by 0.35. In the example above, that would be 5 * 0.35 = 1.75. It will be that big square and half that in height. An 8.5 inch square would result in a box 3x3x1.5” deep.
For a bit of fun make a set of boxes that fit nested inside each other - a box, in a box, in a box, ... Make the lids at least 1/2" smaller. For example, use a 5", 4 1/2", 4", and 3 1/2" squares to make the lids. Then use 4 3/4", 4 1/4", 3 3/4", and 3 1/4" squares for the bottoms.
And of course, you can always add a PVC ring to make a neckerchief slide.