
[Title] [text TOC] [image TOC] [Site Search]
 [Donation]
[Donation]
[Donation]
| Armadillo Tail |
|---|
| Materials | Tools |
|---|---|
|
Armadillo tail Clay Finger nail polish 2' leather lacing 2' stout chord Beads PCV Ring |
Knife Glue |
WARNING: Armadillo's carry leprosy which can be transmitted to humans. Use every precaution when obtaining tails, handling and preparing them. I hesitate to include them for that reason.
See the Miscellaneous Chapter for more instructions, hints, tips, and ideas.
This is not a project for anyone who is squeamish.
The first step is to obtain an armadillo's tail. Since your local craft store probably doesn't carry these, it is necessary to go to the source for the freshest ones. The best place to look is along highways. Ones with wide shoulders or emergency lanes are the safest. Move off the road as far as possible to work in safety. Remove the tail near the base by pulling or cutting with a knife or saw between the bands of armored plating. I carry some zip lock bags (1-gallon size) with me to keep the tails from smelling up the car. Note that collecting "roadkill" may require a permit. Check with authorities first.
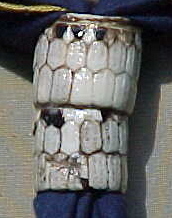
Once you get home or camp, separate the tail in the sizes you want. You can usually make two slides with two segments each. Separate the sections starting from the underside of the tail. That way if you damage it, that will be on the backside of the slide.
Clean out the inside with a knife. The backbone is in the middle of the tail. Run the knife around the backbone from both ends of the section and remove the backbone. Clean out as much of the meat as possible. You can leave it in water for a day or so to soften the remaining meat. Then let it dry for at least a couple days. Another thing you can do is place the tail near an ant mound. The ants will clean it out even better. You may want to tie the tail to a tree with string or wire if you are concerned about critters carrying them off.
Clean out the end of the tail as best as you can. Then let ants finish the job. After the sections are dry and odor free, paint them inside and out with clear fingernail polish. Put on a couple of coats. After the polish dries the rings are ready to wear. If they are too loose, hot glue a PVC ring inside.
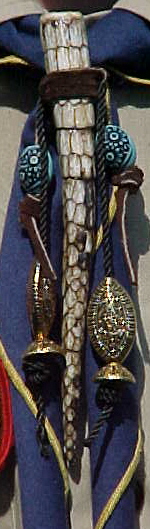
To finish the end section, you will need about 2 feet of leather lacing and 2 feet of stout chord or string and some beads.
You may want to put a piece of clay in the open end to seal in all the extra "stuff" that you weren't able to get out.
Wrap the middle of the lacing three times around the large end just below the last section. Tie in an overhand knot on the underside of the tail and glue the knot and leather in place. Next tie an overhand knot in each end of the leather lacing near the first overhand knot. Tie these knots in opposite directions so the chord hangs the same on each side. Before you tighten the knots slide the chord through it. Slide beads on the lacing and chord and finish with a stopper knot. Trim lacing and chord to length.
To use, put the neckerchief in the hole formed by the chord. Pull down on the two ends of the chord to hold securely.
The ring idea came from a "Boy's Life" issue.