

[Title]
[text TOC]
[image TOC]
[Site Search]
 [Donation]
 |
Snap LED Flashlight |
 |
| Materials |
Tools |
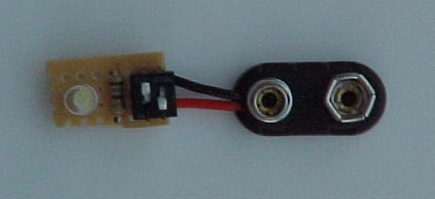
1"x1/2" proto board
Hard plastic 9-volt battery snap
180-ohm resister
2-pin DIP switch
White LED
5/8”x1” diameter heat shrink tubing
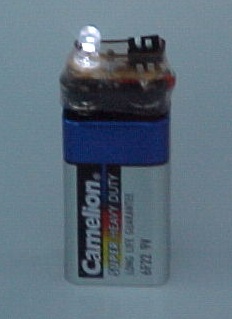
9-volt battery |
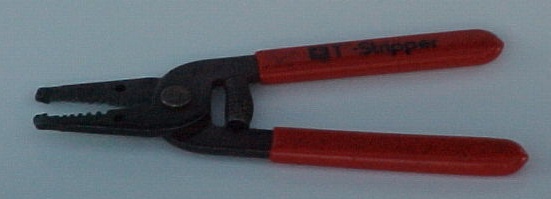
Wire wrap tool
Wire wrap
Wire cutter
Scroll saw
Hair dryer/lighter |
Check here for more information on LED flashlights.
With the increasing popularity of digital cameras, it's becoming harder to find 35mm film canisters. Also, I wanted an LED flashlight that didn't require risky soldering. Introducing LED Flashlight Junior. It's smaller and safer to assemble.
You'll be impressed with the small size and weight of this flashlight. It puts out enough light to read by, organize your gear in the tent, light your way on a trail, or around the house. It is very durable and dependable. It will put out useful light for many tens of hours using the cheapest battery. Since it doesn't require any soldering, it is safer to assemble. It only takes about 30 minutes to make.
These are great for emergency and survival kits, home, work, auto, boating, and camping.
Proto board is plastic with holes on 0.1" centers. They are available in electrical supply stores. You'll need a piece of proto board 4 holes wide and 7 holes long. Cut it out carefully using a hacksaw or scroll saw. Watch out because proto board is brittle and will easily crack.
The wire wrap tool allows you to wrap one wire around another easily so they make a good connection without solder. You can find a handy wire wrap tool and stripper at Radio Shack #276-1570 for about $7.

Wire Wrapping Tool and Stripper
To wire wrap, start by removing about 1/2" of insulation from the end of the wire and insert it into the side of the wire wrap tool up to the insulation. Bend the wire back along the handle and hold it in place. Take the lead of the part you want to attach to the wire and insert it into the hole in the center of the wire wrap tool. Push the part and wire wrap tool against opposite sides of the proto board (if not the part will wiggle and be more prone to breaking off). As you are wrapping the wire around the lead, don’t apply any downward pressure. This would cause the wire to bunch up at the base of the lead. You want the wire to spiral up the lead. Hold the wire wrap at about 90 degrees to the tool. Now turn the wire wrap tool about six times until the wire is completely wrapped around the lead. This makes a good strong electrical connection and locks the part in place.
Next, stretch the remaining wire past the second lead you are going to connect. Cut the wire about 1/2" beyond the second lead. Strip the insulation off the last 1/2" of the wire and wrap as indicated above.
Wire Cutter and Stripping Tool
Use cheap batteries available in dollar stores. Sometimes you can get them two for one dollar.
Top
Bottom
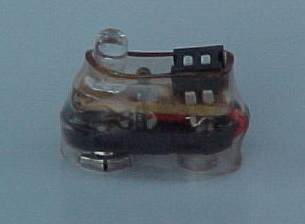
The drawing on the left below shows the placement of parts on the top of the proto board. The drawing on the right shows how the connections are made on the bottom of the proto board.

Parts Layout and Wiring Diagram
- Cut proto board to size and sand the edges smooth.
- Insert the LED into the middle of the 6th row of holes. Trim the leads of the LED in half so the wire wrap tool will fit all the way down on the leads. Keep the short lead shorter than the long lead.
- Wire wrap the long lead of the LED (see the instructions above). Cut off the wire at about 2”.
- Now wire wrap the short lead of the LED. Cut off the wire at about 4”.
- Insert the resistor in the 4th row of holes on the proto board. Trim the leads to about 1/2" so the wire wrap tool will fit all the way down on the leads.
- Now take the wire attached to the long lead of the LED and attach it to one end of the resistor.
- Insert the switch at the end of the proto board into rows 1 and 2.
- Now take the wire attached to the short lead of the LED and attach it to the switch. Stretch the wire past the switch and cut it off about 1" beyond. Strip 1” of insulation off the end of the wire. Insert the wire into the wire wrap tool. Wire wrap about half of the wire (about 5 turns) around the switch lead in the second hole. Then move the wire wrap tool to the switch lead in the first hole and finish wire wrapping on it. This ties the two ends together electrically so that either switch will turn on the flashlight.
- Cut the red and black leads to the battery snap to 1-1/4”. Strip 3/4” of insulation from the BLACK wire of the battery snap. Strip 1/2” of insulation from the RED wire of the battery snap.
- Isolate 3 strands of the BLACK wire and bend the remaining strands back along the insulation. Note: Use these extra strands if you have trouble with the first set of 3 strands. Twist the 3 isolated strands together.
- Insert the wires of the BLACK battery snap lead into the wire wrap tool. Wrap about 4 turns around the switch lead in the second hole. Then move the wire wrap to the switch lead in the first hole and finish the wrapping. Trim off the extra strands.
- Isolate 3 strands of the RED wire and bend the remaining strands back along the insulation. Note: Use these extra strands if you have trouble with the first set of 3 strands. Twist the 3 isolated strands together.
- Insert the wires of the RED battery snap lead into the wire wrap tool. Wire wrap them around the other end of the resistor. Clip off the extra strands.
- Make sure none of the leads are touching. Attach a 9-volt battery to the snap. Test the circuit by switching ON either or both of the switches. Correct any problems you have (loose wires or bare wires that are touching).
- Trim all the leads to within about 1/8” of the back of the proto board.
- If you want, you can put a blob of E-6000™ glue on the back of the proto board. This will hold the components onto the board more securely and hold the snap and proto board together.
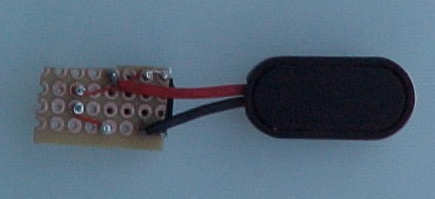
- Fold the proto board on top of the battery snap. Wrap a wire around the middle of the battery snap and proto board to hold them together. Twist the ends together above the proto board.
- Slide the heat shrink around the battery snap and proto board. It should be touching the top of the battery. While holding onto the battery, heat the heat shrink tubing with a hair dryer or lighter until it shrinks into position and firmly holds everything in place.
- Remove the wire that is holding the battery snap and proto board together.
Ready for more fun with LEDs? Try these out:
Copyright © 2008 Vincent Hale