

[Title]
[text TOC]
[image TOC]
[Site Search]
 [Donation]
| Materials |
Tools |
Film canister
Screw-on bottle cap
9-volt battery snap
2 white LEDs
68-ohm resistor
200-ohm resistor
Single throw, double pole switch
9-volt battery
6" wire
6" of 3/16" Heat shrink
Triglide
24"x1" elastic band
4" x 1 1/2" leather
3/16" x 1" bolt and wing nut
|
Tape
Needle and thread
Leather hole punch
Knife
E-6000™ glue
Soldering iron
Blow dryer
Small hacksaw
File
Wire cutters/strippers
Needle nose pliers
Drill
Sandpaper
|
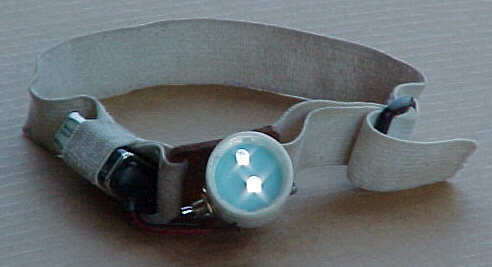
This is my favorite headlamp. It is simple to make, durable, reliable, very light weight, inexpensive, and runs a looooooooooong time on a battery.
This same style could be made using just a single LED to make it simple enough for ten years olds. See the page on making a single LED flashlight for the circuit and complete instructions.
This headlamp weighs 3.25 ounces including the battery. The LED flashlight weighs 2.2 ounces itself, so the whole headband and bracket weigh about an ounce. This weight is worth the convenience to me.
Use a single throw, double pole switch. This gives you the option of either using a single LED or two LEDs. At night inside your tent, you can get by using a single LED.
The lid is from a soft drink or water bottle. They will press firmly into the film canister. I chose a clear film canister and white lid so the light radiated out of the side will illuminate the surroundings a little bit more. It works great to light up your whole tent. However, it is a bit annoying when wearing as the light through the side of the film canister bothers my eyes. You can glue a piece of dark plastic or aluminum foil to the lower side of the film canister to help this.
This can also be made without a soldering iron and heat shrink. Use the thin wire wrap and a wire wrap tool. These can be purchased at electronics store like Radio Shack™
These instructions assume that you are familiar with electronics or have already made an LED flashlight. If you haven't, then see the following page for general information on constructing an LED flashlight.
- Prepare the film canister
Run a strip of tape around the film canister about 1 1/4" from the bottom. Make sure the ends line up - this will make a straight line all around the canister. Now cut the film canister with a sharp knife using the tape as a guide. Place the sandpaper on a flat surface and sand the edge of the film canister flat. Remove the tape.
Using a hole punch, make a hole for the switch near the bottom of the film can. Make a small hole for the wires near the switch.
Switch Placement
- Prepare the lid
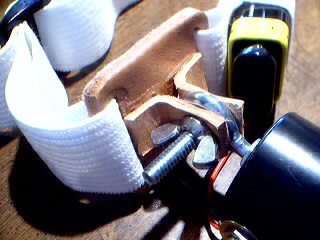
Drill the holes for the LED leads as in the photo. You'll need a 1/16" drill bit. When your headlamp is finished the top LED should be the one on in the single LED mode.
Close-up of Inside
- Prepare the switch
You may want to cut the switch paddle shorter. This will keep it from turning on as often in your pack. Don't cut it too short; there is a small piece inside the paddle. If you cut the paddle too short, this piece will fall out and the switch won't work anymore. Cut part of the paddle off with a hacksaw and file the edge smooth.
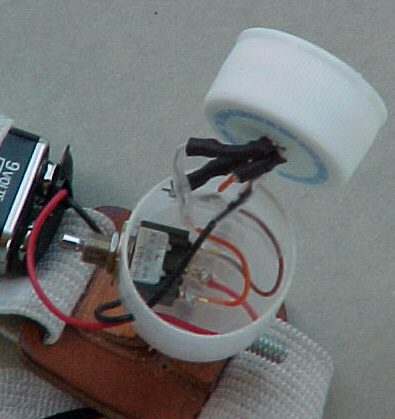
- Make the circuit
Use the circuit drawing above. Remember to use heat shrink as needed.
- Shorten the leads of the LEDs to about 1/2", keeping the long lead longer than the short lead. Insert the LEDs into the screw-on lid and wire the short lead of one to the long lead of the other.
- Insert the battery snap leads through the small hole in the film canister. Connect the black wire (negative or minus) to the short lead of the LED.
- Connect the 68-ohm resistor to the long lead of the first LED, a couple inches of wire, and one side of the switch.
- Connect the 200-ohm resistor to the long lead of the second LED (already has a wire attached), a couple inches of wire, and the other side of the switch.
- Connect the red wire (positive or plus) to the middle of the switch.
- Test to make sure the circuit works. Warm the heat shrink with a hair dryer.
- Install the switch in the film canister.
- Insert the wires and lid into the film canister by pulling the battery snap leads gently out of the film canister, gently wrapping the wires around in a circle and pushing them into the film canister, and pressing the lid into the film canister.
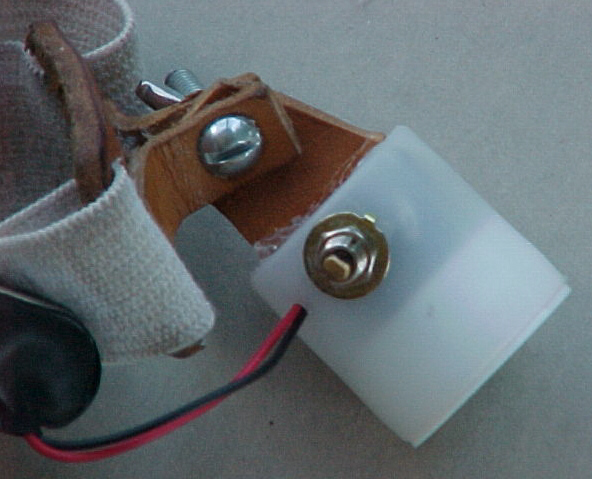
- Make the leather bracket
Shape a piece of leather about 1" long. It should taper from 1" at the end that will attach to the film canister to 1/2" that the bolt will go through. Punch a hole in the small end for the bolt. Use sandpaper to roughen up the bottom of the film canister. Glue leather onto film canister using E-6000™ glue. Set it aside and prop up the leather so it doesn't move while drying.
You could substitute a "T" or "L" shape made of stiff plastic.
- Make the base for the headband
Cut out the leather base, it should be about 1 1/2" square. Use a hole punch to put two small holes 1" apart on two opposite sides of the base. Use a sharp knife and straight edge to cut slits between the two holes on each side. Cut out two pieces of leather about 3/8" x 1 1/2" for the bracket. Glue them to the base using E-6000™ making an "L" shape with each. Do NOT glue the ends of the bracket together as the leather on the film canister lamp must slide between them. Use clamps (spring clothes pins work) to hold the brackets in place on the base until the glue dries (at least an hour). When the glue has dried, remove the clamps and trim the brackets so the ends are even and do not block the two slits. Punch a hole in the two brackets for the bolt.
Base
- Make the headband
The 1" triglide is used to adjust the fit of the headband. It can be found in good camping stores and some hardware stores. You may also have a supply close at hand. My boys go through book bags about once a year. You can save the plastic clips from these for use on many projects. You can also make one easily from a scrap piece of plastic or leather.
Put one end of the elastic band through one of the slots on the side and sew it to itself. Put the triglide on the elastic band. Now put the other end of the elastic band through the other side slot and then feed it back through the triglide. Adjust the elastic band so that it fits your head comfortably. Leave some extra elastic band in case you want to put your headband on over a hat. Cut off the excess elastic band. Put a little bit of white glue or E-6000™ on the ends of the elastic band to keep it from unraveling.
If you want to put an elastic band on the top, cut a slit in the leather base. Then wrap a piece of elastic around the headband and sew it to itself. This will form a loop around the back of the headband that will allow the top band to slide on the headband. You will want the loop to fit tightly so the top band doesn't slide too much.
Now slide the top band through a triglide. Put the elastic band through the top slot in the leather base and then back through the triglide. Put a little bit of white glue on the ends of the elastic band to keep it from unraveling.
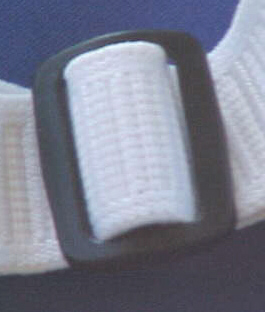
Triglide
- Make the battery holder
The battery is attached to the headband on the same side as the switch, which should be on the opposite side from the triglide.
Take a piece of elastic band about 3 1/2" long. Wrap it around the headband as shown in the photos. It needs to be close to the switch because the wires aren't that long. Sew it into place. Make sure it holds the battery tightly. If it is too loose, you could add some sponge or Styrofoam to take up the extra space.
- Assemble the light to the headband
Push the leather bracket attached to the film canister lamp between the two brackets, push the bolt through the bracket and screw eye and hold it in place with the wing nut.
Remove the battery clip from the battery when not in use to make sure it doesn't accidentally get turned on in your pack.
You could make this fairly water resistant by using E-6000™ glue around the switch and wires (where they come out of the film canister), putting a balloon around the battery and snap, and gluing a piece of clear plastic over the end of the film canister.
The LEDs are by far the most expensive part of the headlamp. You can purchase them for between $2 and $3 USD each depending on the brightness (and where you get them). All the materials for the headband, electronics, and hardware will cost about $3 USD. So for as little as $7 and a little time, you can make a GREAT headlamp.
Just a word about brightness. The human eye can discern a difference in two lights if one is twice as bright as the other. That is if one LED is 2,000 mcd and another is 5,000 mcd, you could tell the difference. You probably couldn't tell the difference between 4,000 mcd and 5,000 mcd.
If you ever want to remove the lid from the film canister, simply screw the lid onto a bottle and pull it out.
While walking on a trail at night, hold the light in your hand down at your side. This will cause the light to cast bigger shadows which will make it easier to judge sizes, shapes, and distances. When the light is on your head, the shadows are smaller and the trail looks more two dimensional. Holding the light closer to the ground will give more of a three dimensional appearance. In addition, the light will be closer to the trail and thus be brighter.
Search for critters at night with headlamps on your forehead. You will see the reflection from the eyes of spiders, cats, ...
Ready for more fun with LEDs? Try these out:
Copyright © 2005 Vincent Hale