

[Title]
[text TOC]
[image TOC]
[Site Search]
 [Donation]
 |
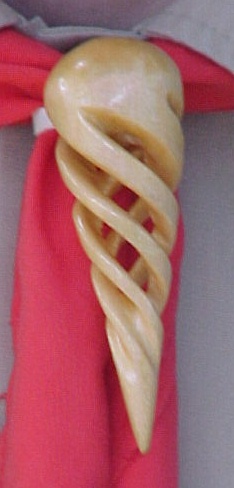
Spiral |
 |
| Materials |
Tools |
1" x 1" x 3" basswood
PVC ring |
Pencil
Flexible ruler
Knife
Sandpaper/emery board
Clear finish |
See the Wood Carving section for more instructions, hints, and tips.
Here's a curious looking project. Folks will wonder how you got the wood out of the center. You should plan on carving at least two of these because almost everyone breaks the first one.
- Preliminary Layout
- On the two ends, draw diagonal lines between the corners. Number the line segments 1 through 4.
- Draw a line 1/2" down from the top on all sides - this will form the ball or decoration at the top.
- Draw a line down the center of each face. This will give you a guide for the next step - rounding the block.
- Round the whole block into a cylinder.
- Redraw the line 1/2" down.
- Taper the cylinder from that line on down to the end making a cone. Make it about 1/4" in diameter at the tip.
- Layout - drawing the spiral
- Line up the ruler between the diagonal lines on the top and bottom and make a small mark every 1/2" down the cone from the line to the point.
- Repeat this for the other three sets of diagonals.
- Lay the flexible ruler or a piece of paper so that it connects the top point on diagonal 1 with the second point on diagonal 2. Draw a line connecting these two points. Next connect point 2 of diagonal 2 to point 3 of diagonal 3, point 4 of diagonal 4, and finally point 5 of diagonal 1.
- Repeat this starting with point 1 of diagonals 2, 3, and 4.
- Now you are ready to start cutting the spiral. Warning: unlike most carving projects where your last cuts are the ones that show, here your first cuts will show. Start on spiral line 1 and make a straight in cut along the line. Stop about 3/4" from the bottom or you will run out of wood. Then go back and make a V cut centered on the line. In the end, the V notch (the gaps between the spirals) and wood will both be about 3/16" wide. Continue until you have done all of line 1. Then repeat for the other three lines.
- Work to keep the lines straight and neat. Keep carving the V notch deeper down the lines until you finally break through. Then take a break, get a drink, walk around, strop your knife. At this point the spiral becomes very fragile. All cuts must be done with care so not too much pressure or twisting is put on the spirals. Clean out the center as best you can with your knife continuing the V cuts. The spirals will be triangular in cross-section.
- If a spiral breaks, put it back together with some wood glue. You can put some tissue paper inside for support and tape the outside to hold it in place.
- Now carve the ball on top of the spiral. Choose one of the diagonal lines and carve the two opposites sides up to that line. Then carve the other two sides. Finally round it all over.
- After you've finished cutting, sand the outside and inside with coarse sandpaper or an emery board. Inspect each spiral and take down any high spots. Remember all the first cuts I told you to be careful with? That's what you are fixing now.
- Form the top and bottom of each spiral so it flows smoothly.
- Sand with fine sandpaper.
- Finish with a clear varnish or lacquer to show off the wood. If you paint it, people will think it is made of plastic.
- Glue a PVC ring to the back for a neckerchief slide or put a small screw eye in the top for an ornament.
Options:
A 1" x 1" x 6" makes a good size for a Christmas tree ornament.
For a different look, start with a longer piece of wood and leave the extra at the top for a Santa, ball in a box, several spheres or whatever you can dream up and carve.
Copyright © 2006 Vincent Hale