

[Title]
[text TOC]
[image TOC]
[Site Search]
 [Donation]
 |
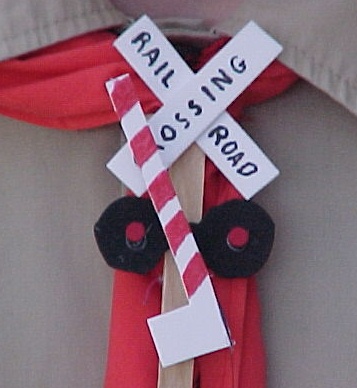
Rail Road Crossing |
 |

| Materials |
Tools |
White foam 1" x 4"
Black foam 1" x 2"
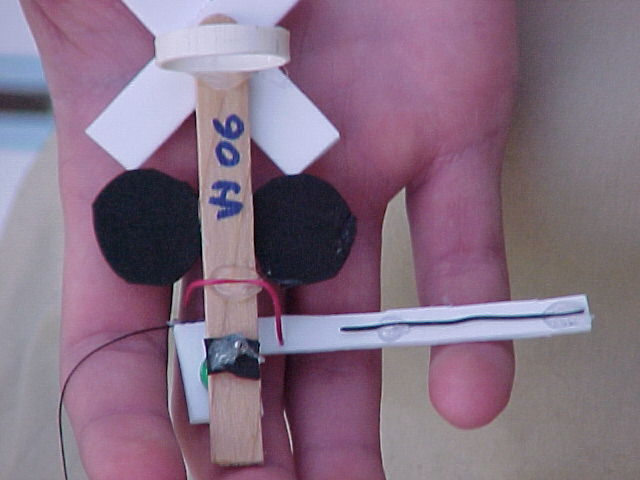
Popsicle stick
Flat head nail
2' thread
4" wire
2 pony beads
2 red sequins
PVC ring |
Hot glue
Scissors
Red marker
Black marker
Wire cutter |
See the Moving Chapter for more instructions, hints, tips, and ideas.
The nail used for the pivot should have a flat head and cut to about 5/8" long with wire cutters.
Pre-drill the hole in the stick about 2 1/2" down from the top.
Wire is used to weigh down the arm. Other material could be used.
- Cut out the foam pieces for the sign each 2" long and 3/8" wide.
- Glue them into an X with the / on top of the \. Using the black marker, print RAIL on the top left, ROAD on the bottom right, and CROSSING from the bottom left to the top right. You could print these on a computer and glue them in place using white glue.
- Glue the X onto the top of the Popsicle stick using hot glue.
- Cut out black circles for the signal lights. If you want, leave a bar connecting the two circles. Use a nickel or other small coin as the template. Punch out two red holes and hot glue them to the center of the circles. You could substitute red sequins.
- Glue the signal warning lights to the stick. Just below the sign.
- Cut out the arm as shown. It should be about 3" long. The base of the arm has a square on it. Draw red bands on the arm with a permanent marker as shown in the photo.
- Hold the thread on top of the base of the arm and run a thin bead of hot glue over the string. Trim off any excess thread by the arm. Tie a pony bead to the other end of the string. You may want to shorten the thread so the bead doesn't swing all over the place.
- Glue a 2" piece of wire to the very end of the back of the arm.
- Glue the nail head in the center of the back of the square base on the arm.
- Put a pony bead on the nail and put the nail in the hole in the stick. Place a small piece of foam on the nail point and glue in place with a drop of hot glue. The bead and arm should be able to turn freely. Cut off the tip of the nail.
- Bend a 2" piece of wire in the shape of a U. Hot glue it to the back of the stick just below the signal lights. This will act as a stop to keep the arm horizontal in its resting state and keep it from going past vertical when raised. Adjust the wires so that the arm is horizontal at rest and not quite vertical when raised.
- Cut off any excess Popsicle stick with wire cutters.
- Hot glue a PVC ring to the back of the top of the stick to complete your neckerchief slide.
Copyright © 2006 Vincent Hale