
[Title] [text TOC] [image TOC] [Site Search]
 [Donation]
[Donation]
[Donation]
| Branch Cross Section |
|---|
| Materials | Tools |
|---|---|
|
2" diameter branch PVC ring |
Saw Sander Saw horses and clamps Future Acrylic Floor Polish™ Permanent Marker Newspaper Hot Glue |
See the Found Chapter for more instructions, hints, tips, and ideas.
This slide doesn't take long, but may have to be done over several meetings to allow for drying time.
Sand the end of the branch until it is very flat and smooth. This is best done with a belt sander. Use caution when using power tools! Now cut off a half-inch slice of the branch. Repeat until you have enough for everyone. Use a permanent marker to put initials on the backside.
Lay newspaper on a flat surface and place the wood smooth side up. Pour some Future™ and spread it out evenly with your finger. You can clean up with soap and warm water. Let dry 1-2 hours. You may have to repeat this a couple times to get a real shiny finish.
Glue a PVC ring to the back using Hot Glue.
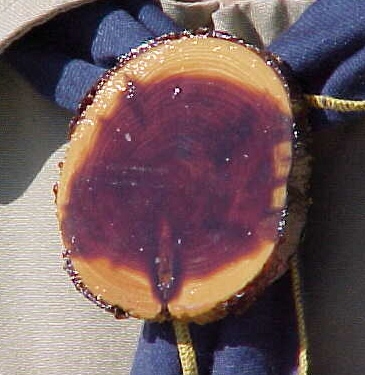
Now get to know your limb. What kind of life has it had? What kind of tree is it from?
See the alternating light and dark rings? The dark rings are formed during the summer. How many years old is yours?
Rings that are close together indicate a hard dry summer. Rings that are further apart are formed during wet years.
Do you see any irregular marks that might be the scar from an injury? Do you see any oval shapes where branches used to be?
Is the center of the rings off-center in the branch indicating it might have been shaded by another tree?