

[Title]
[text TOC]
[image TOC]
[Site Search]
 [Donation]
 |
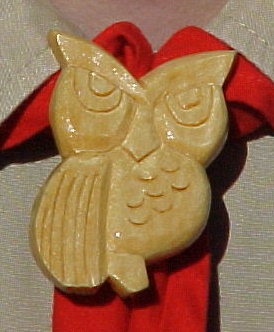
Owl |
 |
| Materials |
Tools |
1 3/4" x 2 1/2" x 1/4" basswood
PVC ring |
Glue stick
Scissors
Scroll saw
Knife
U gouge
V gouge
Pencil
Sandpaper
Finish
E-6000™ glue |
See the Wood Carve section for more instructions, hints and tips.
This is a fairly easy project for beginners. The first one will take about an hour, but with a little practice you can make one in less than 15 minutes.
For this project, have the grain of the wood running vertically.
Print and cut out the template and glue it to the wood using a glue stick. Cut out the owl with a scroll saw.
- Angle the very top of the head so that it slopes downward about 1/16". These are the feather tufts that look like the eyebrows or ears. Slope them down towards the eyes.
- Make straight in stop cuts about 1/16" deep along the top edge of both eyes all the way from the outer edge to the center at the top of the beak. Remove a wedge of wood from above the stop cut. This angles the top of the eyebrows out.
- Make a stop cut around the inside and bottom of both eyes - the outside curved line by the beak and chest. Then round the edges of the eye.
- Round the outside edges of both eyes and body or chest of the owl, but not the back.
- Make straight in stop cuts along the bottom of the beak and remove a wedge below each stop cut to make it look like the beak sticks out. Round the sides of the beak a little and angle the top of the beak back into the wood so that it appears to angle into the head.
- Now carve the eyes. Each eye is formed by two half circles. Use a knife or a small V-tool. Be careful to make the circles the same size and centered on the face.
- Separate the wing from the body with a long curved V cut.
- Separate the feet from the body with a short curved V cut. This should blend into the rounded edge of the body. Cut the corners off of the three sides of the feet.
- Make the long curved lines of the feathers on the wings either with a knife or V-tool.
- Make the feathers on the body. If you have a U-gouge the right size it makes this step easier. Otherwise make the cuts with your knife. Make the cuts with the knife (or U-gouge) handle angled 45 degrees away from the head. For right now, just make theses small marks. Then remove the paper with a knife or sandpaper. Then go back and make the marks deeper. This will raise the feathers up and give them a texture.
Remove any remaining paper using your knife and/or sandpaper. Clean up the carving if necessary.
Glue a PVC ring to the back using E-6000™ glue to make a neckerchief slide. The owl can also be made into a neat looking ornament, pin, SWAPS, or necklace. These also provide a convenient handle for holding while you apply a finish.
Apply your favorite finish. The owl in the photograph above is finished with Deft™, gloss spray sealer. I should have used Watco™ Dark first because the dark shade would fill in the low parts of the carving giving them more depth and making them stand out more.
Copyright © 2011 Vincent Hale